JM MegaMall- Responsive Magento theme for online supermarket
Thank you for purchasing our theme. If you have any questions that are beyond the scope of this help file, feel free to do the following steps to send us any question:
1. Leave your email address under the comment box of the our theme on Themeforest , this will help us to make sure you know about www.joomlart.com via Themeforest.net
2.Open a new ticket using email address on step 1 at http://support.joomlart.com/index.php?/Tickets/Submit. ( Select option JMTC)
Please note that:
* Support time: Monday – Friday 8AM to 5PM GMT +7
* Response Time: Within 24 hours (1 business day).
* Support is not available on Saturday & Sunday due to our weekend break.
Support for my items includes:
* Responding to questions or problems regarding the item and its features
* Fixing bugs and reported issues
* Providing updates to ensure compatibility with new software versions
Item support does not include:
* Customization and installation services
* Support for third party software and plug-ins
Installation Services
*Quickstart installation services cost $40, submit your request at http://support.joomlart.com/index.php?/Tickets/Submit. ( Select option JMTC)
JoomlArt
Introduction
Responsive Magento theme JM Megamall is a professional makeover for any online supermarkets or retail stores. JM Megamall features up to 8 complimentary Magento extensions including Mega Menu, JM Basetheme, JM Product, JM Product Slider, JM Quick View, JM Masshead, JM Slideshow and JM Advanced Search. Also this Mangento theme is fully responsive and supports Off-canvas navigation.
This documentation is to guide you about how to install and configure the responsive Magento theme JM Megamall to your own website.
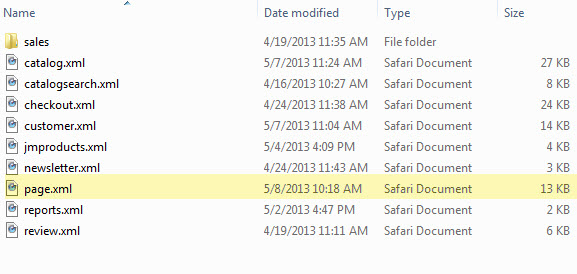
Once downloaded JM Megamall, you will get a zipped file including the following folders:
- Documentation : contains userguide
- Extensions: contains all extensions built in the theme
- Theme: contains the template files only
- Quickstart: is a full Magento CMS version with our template already integrated to match demo
- PSD : contains all source files of the theme
Unzip the file. Please be noted that there are two ways to install a JoomlArt Magento theme:
- General Installation: Applicable when you have installed a Magento base on your server before.
- Quickstart Installation: Applicable for JoomlArt Magento users. With Quickstart, you will get a site just as the same as our Demo site.
We are going through each way of installation in advance of more further configurations.
General Installation
In case you have installed the Magento base already, this way of installation will help you to adapt the theme and extensions of JM Megamall to fit your current site. Let's see how to install the theme and its extensions respectively.
1. Theme Installation
Please make sure your Magento store is ready before you integrate JM Megamall. If your store has not been available yet, get it done quickly by following the Magento Installation Guide.
The installation of JM Megamall is quite simple with several following steps:
1. Upload the folders skin and app from our download package to your Web server's document root (from here on, referenced as {docroot}.
2. Unzip "JM Megamall" package. Next, copy the two folders skin and app to the root of your Magento site folder on the server. Accordingly, the folders will be overwritten and you should see a directory layout like this: {docroot} /magento/app/ index.php js/ lib/ LICENSE.txt media/ pear/ skin/ var/.
3. Open the Admin Panel of your store, and access Magento Admin area on a stage localhost: http://localhost/magento/index.php/admin/, then log in your Magento Admin area.
4. Navigate to System >> Configuration >> Design. Simply replace the original name e.g. jm_purity with jm_megamall.

5. Fill "jm_megamall" into the Themes tab.

6. You can also change the settings for JM Megamall Header.

7. Click the button "Save Config" to save your configuration.
You are done! JM Megamall is now ready to go!
2. Extension Installation
To install the built-in extensions of JM Megamall, please follow steps as below.
- Upload folders skin and app from our download package to your Web server's document root (from here on, referenced as {docroot}). These files will overwrite default folders skin and app in your Magento folder. Thus, you should see a directory layout like this: {docroot} /magento/app/ index.php js/ lib/ LICENSE.txt media/ pear/ skin/ var/.
- Log into your Magento Admin area (i.e. access Magento Admin area on localhost: http://localhost/magento/index.php/admin/).
- Navigate to System >> Configuration.
- The installed extensions will show off. To enter the extension configuration page, click the extension's name tab.
3. Create Static Blocks
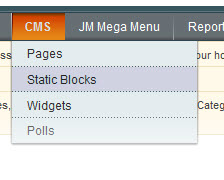
- Go to Magento Admin Panel >> CMS >> Static Blocks.
- Click "Add new Block" button.
-
Fill in all fields as below then click "Save Block" button:
- Title: Right module
- Identifier: right_block
- Store View: All Store Views
- Status: Enable
- Content: fill in all syntax quoted as you would like.
-
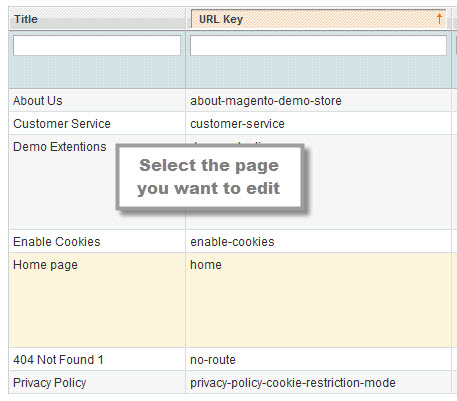
To edit the existing static blocks, go to CMS >> Pages and then select the page in which blocks you want to edit.
- In General Information tab, fill in the Content field with syntax quoted.
- To display a new static block, copy and paste the following code in the "Layout Update XML" field in "Design" tab.
<html>

<reference name="right">

<block type="cms/block" name="jmtabs" before="-">

<action method="staticblock">

<title><strong><COLOR=Red>New block</COLOR></strong></title>

<identifier><strong><COLOR=Red>new_block</COLOR></strong></identifier>

</action>

</block>

</reference>

</html>
Clear cache if needed (in System >> Cache Management >> Save cache settings). Refresh your Homepage to see the change applied.
Quickstart Installation
Quickstart package is to minimize time and effort in installing your eCommercial sites with the contents just like the Demo sites. Please be kindly noted that, with Quickstart, all your existing data will be overwritten. Thus, we recommend using Quickstart for your first installation with our Magento theme or just in case you want to refresh your own site to the very beginning.
Please follow steps as below.
- Download the Quickstart package from JM Magento download section.
- Extract and Upload the whole Quickstart package to your server. In Quickstart folder you will see the extracted folder that includes all sample data.
-
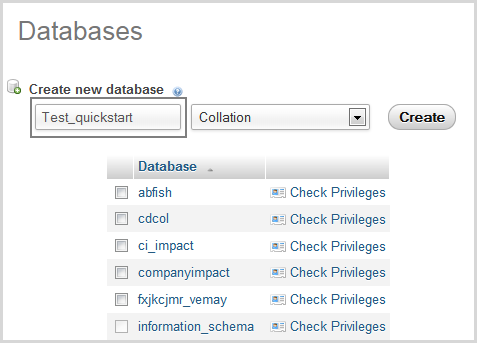
Create a database for your Magento store (using phpMyAdmin).
-
Start the installation process by opening a browser and navigate to
your URL (where the Quickstart package uploaded) to load the default
Magento installer.
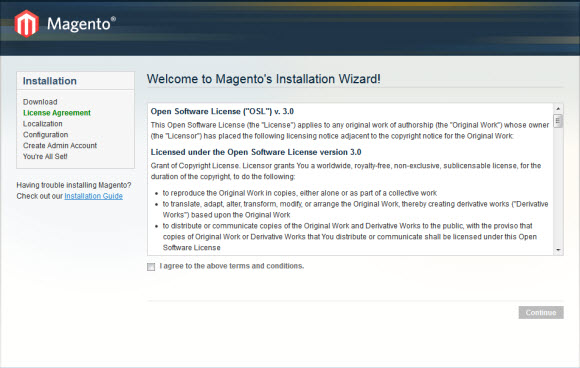
- Kindly follow each step of the Installer so that the installation process can be set.
Note:
- Do not use "localhost" in URL, otherwise you could not log into your Admin area (you should use your local IP in case of installing on your computer).
- Leave "Tables prefix" field blank.

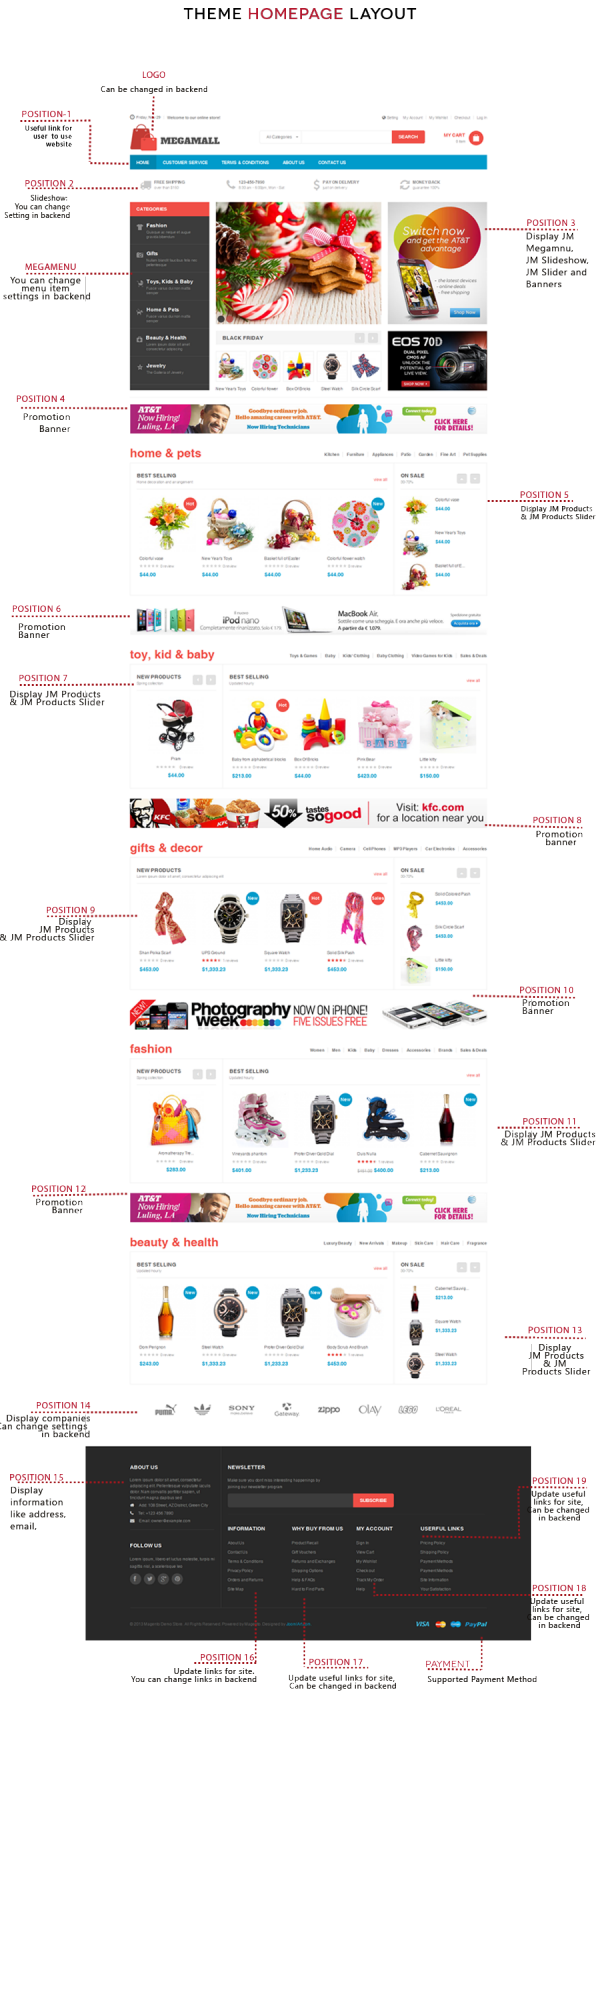
Layout and Block Positions
The layout of JM Megamall Homepage can be illustrated as below.
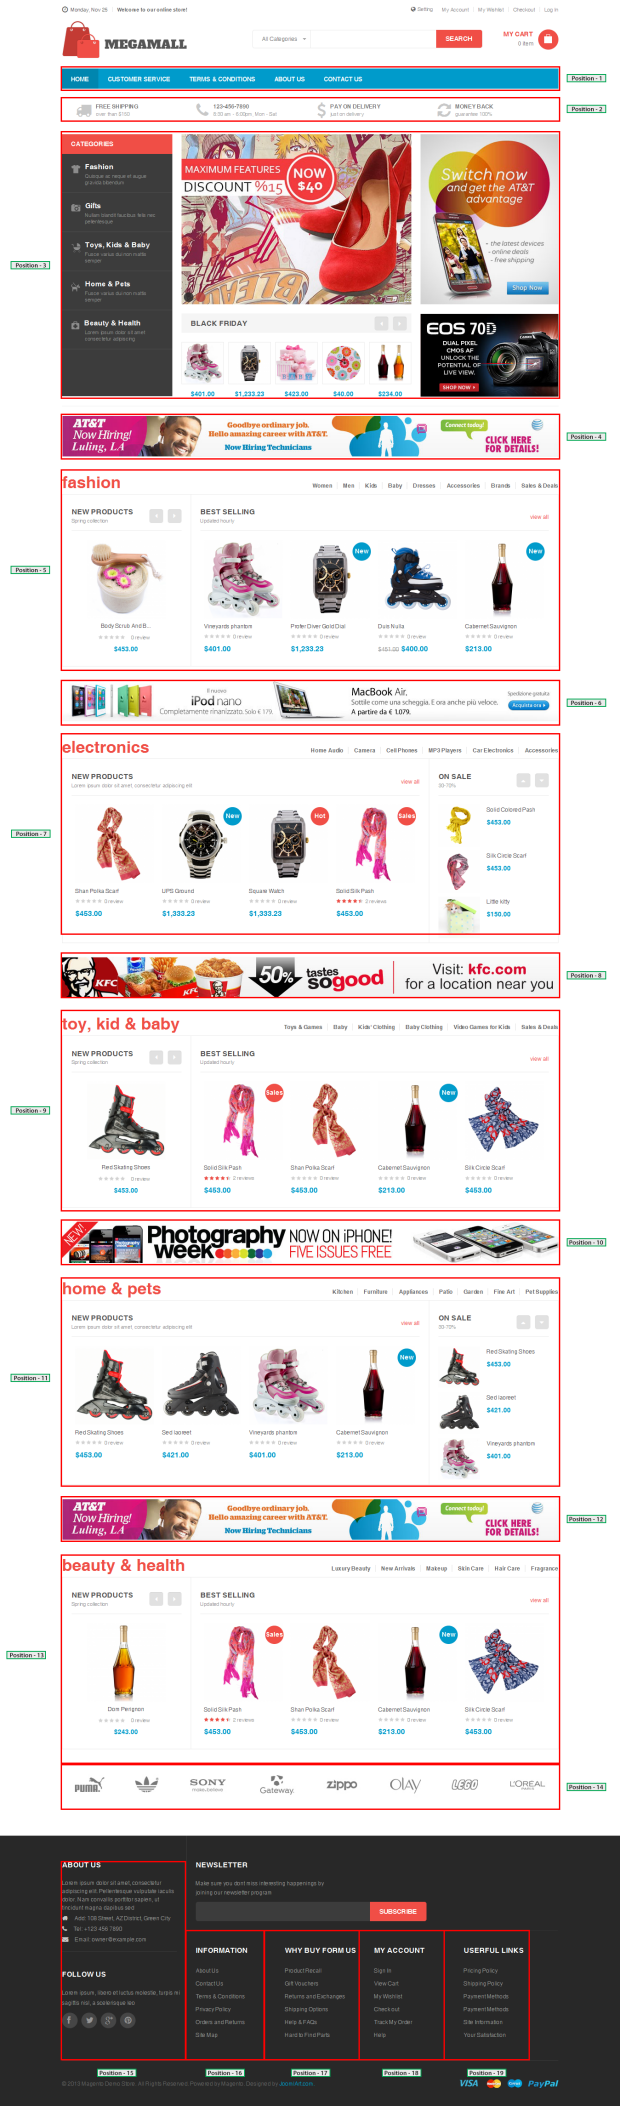
In the front-page, JM Megamall has these following static blocks.
position-1 | position-2 | position-3 | position-4 | position-5 | position-6 | position-7 | position-8 | position-9 | position-11| position-12 | position-13 | position-14 | position-15 | position-17 | position-18 | position-19 | position-20 | addshare | colors | contactinfo | featured-product
To create a new block, refer to the above guide for details.
Page Configuration
This section will guide you to configure your pages just as the Demo site of JM Megamall.
I. Homepage
See the detailed layout of JM Megamall Homepage below.
 Page Configuration
To configure this page, in the Magento Admin Panel, please navigate to CMS >> Pages. Firstly, create a new page named {Homepage} in "Page Management" section.
Copy and paste the following code into the "Design" field.
- Page Information Tab: click to see the Back-end Settings.
- Content Tab: click to see the Back-end Settings.
- Design Tab: click to see the Back-end Settings.
<reference name="header">

<remove name="top.menu" />

</reference>

<reference name="tops0">

<block type="cms/block" name="position-1">

<action method="setBlockId"><block_id>position-1</block_id></action>

</block>

</reference>

<reference name="tops1">

<block type="cms/block" name="position-2">

<action method="setBlockId"><block_id>position-2</block_id></action>

</block>

</reference>

<reference name="tops2">

<block type="cms/block" name="position-3">

<action method="setBlockId"><block_id>position-3</block_id></action>

</block>

</reference>

<reference name="tops3">

<block type="cms/block" name="position-4">

<action method="setBlockId"><block_id>position-4</block_id></action>

</block>

</reference>

<reference name="tops4">

<block type="cms/block" name="position-5">

<action method="setBlockId"><block_id>position-5</block_id></action>

</block>

</reference>

<reference name="tops5">

<block type="cms/block" name="position-6">

<action method="setBlockId"><block_id>position-6</block_id></action>

</block>

</reference>

<reference name="tops6">

<block type="cms/block" name="position-7">

<action method="setBlockId"><block_id>position-7</block_id></action>

</block>

</reference>

<reference name="tops7">

<block type="cms/block" name="position-8">

<action method="setBlockId"><block_id>position-8</block_id></action>

</block>

</reference>

<reference name="tops8">

<block type="cms/block" name="position-9">

<action method="setBlockId"><block_id>position-9</block_id></action>

</block>

</reference>

<reference name="tops9">

<block type="cms/block" name="position-10">

<action method="setBlockId"><block_id>position-10</block_id></action>

</block>

</reference>

<reference name="tops10">

<block type="cms/block" name="position-11">

<action method="setBlockId"><block_id>position-11</block_id></action>

</block>

</reference>

<reference name="tops11">

<block type="cms/block" name="position-12">

<action method="setBlockId"><block_id>position-12</block_id></action>

</block>

</reference>

<reference name="tops12">

<block type="cms/block" name="position-13">

<action method="setBlockId"><block_id>position-13</block_id></action>

</block>

</reference>

<reference name="mass-bottom">

<block type="cms/block" name="position-14">

<action method="setBlockId"><block_id>position-14</block_id></action>

</block>

</reference>
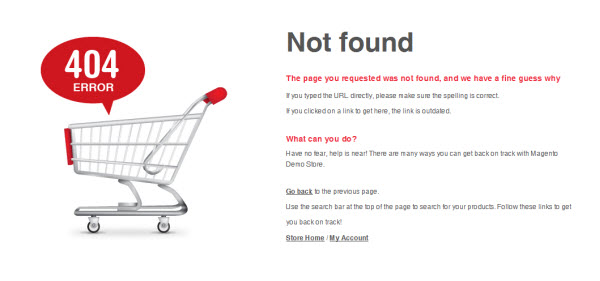
II. 404 Page
To configure this page, in the Admin Panel, navigate to CMS >> Pages, select 404 Not Found 1 page to edit the following settings.
- Page Information Tab: click to see the Back-end Settings.
- Content Tab: click to see the Back-end Settings.
Copy and paste the following code into the "Content" field.
<div id="jm-error">

<div class="page-head-alt">

<h2>Not found</h2>

</div>

<h3>The page you requested was not found, and we have a fine guess why</h3>

<ul class="none-disc">

<li>If you typed the URL directly, please make sure the spelling is correct.</li>

<li>If you clicked on a link to get here, the link is outdated.</li>

</ul>

<dl><dt>What can you do?</dt><dd>Have no fear, help is near! There are many ways you can get back on track with Magento Demo Store.</dd><dd>

<ul class="none-disc">

<li><a onclick="history.go(-1);" href="#">Go back</a> to the previous page.</li>

<li>Use the search bar at the top of the page to search for your products. Follow these links to get you back on track!</li>

<li><a href="{{mall url=""}}">Mall Home</a> / <a href="{{mall url="customer/account"}}">My Account</a></li>

</ul>

</dd></dl></div>
Front-end Appearance:
Static Block Configuration
1. position-1: Position 1
Back-end Settings<ul> <li class="active"><a href="{{mall direct_url=""}}home">Home</a></li> <li><a href="{{mall direct_url=""}}customer-service">Customer Service</a></li> <li><a href="{{mall direct_url=""}}privacy-policy-cookie-restriction-mode">Terms & Conditions</a></li> <li><a href="{{mall direct_url=""}}about-magento-demo-mall">About us</a></li> <li><a href="{{mall direct_url=""}}contacts">Contact us</a></li> </ul>
Front-end Appearance:

2. position-2: Position 2
Back-end Settings<ul> <li class="first"><em class="fa fa-truck"></em> <span>free shipping</span> over than $150</li> <li><em class="fa fa-phone"></em> <span>123-456-7890</span> 8:30 am - 6:00pm, Mon - Sat</li> <li><em class="fa fa-usd"></em> <span>pay on delivery</span> just on delivery</li> <li class="last"><em class="fa fa-refresh"></em> <span>money back</span> guarantee 100%</li> </ul>
Front-end Appearance:

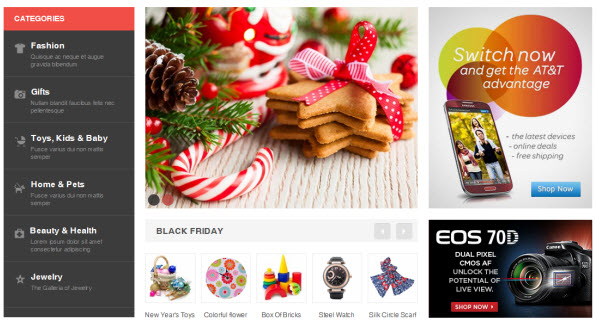
3. position-3: Position 3
Back-end Settings<div class="col-1"> <div class="block vertical-mega-menu"> <div class="block-title"><strong>Categories</strong></div> {{block type="jmmegamenu/jmmegamenu" name="catalog.topnav12" output="toHtml" }}</div> </div> <div class="col-2"> <div>{{block type="joomlart_jmslideshow/list" name="home.jmslideshow.list" }}</div> <div>{{block type="joomlart_jmproductsslider/list" title="Black Friday" name="home.jmproductsslider.list" mode="latest" catsid="7"}}</div> </div> <div class="col-3"><img src="{{media url="wysiwyg/callout/callout_1.jpg"}}" alt="Megamall" /> <img src="{{media url="wysiwyg/callout/callout_2.jpg"}}" alt="Megamall" /></div>
Front-end Appearance:
4. position-4: Position 4
Back-end Settings<div><img src="{{media url="wysiwyg/banners/banner1.jpg"}}" alt="Megamall" /></div>
Front-end Appearance:

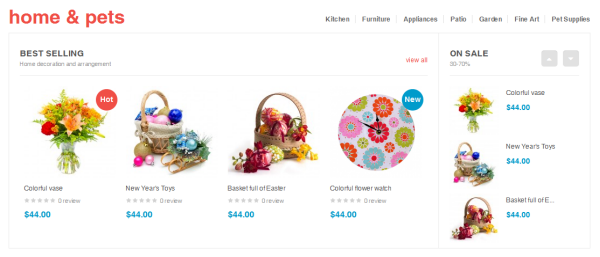
5. position-5: home & pets
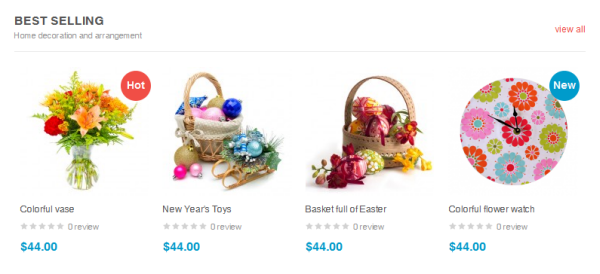
Back-end Settings<div class="block block-cate"> <h2><a href="{{store direct_url=""}}gifts.html">home & pets</a></h2> <ul> <li><a href="#">Kitchen</a></li> <li><a href="#">Furniture</a></li> <li><a href="#">Appliances</a></li> <li><a href="#">Patio</a></li> <li><a href="#">Garden</a></li> <li><a href="#">Fine Art</a></li> <li><a href="#">Pet Supplies</a></li> </ul> </div> <div class="col2-set list-categories list-cate-colr"> <div class="col-1">{{block type="joomlart_jmproductsslider/list" name="cate.jmproductsslider2" template="joomlart/jmproductsslider/verticallist.phtml" title="on sale <span>30- 70%</span>" mode="latest" perrow="1" number_items="3"}}</div> <div class="col-2">{{block type="joomlart_jmproducts/list" name="home.jmproducts.list" title="Best Selling <span>Home decoration and arrangement</span>" mode="latest" template="joomlart/jmproducts/list.phtml" catsid="10"}}</div> </div>
Front-end Appearance:
6. position-6: Position 6
Back-end Settings<div><img src="{{media url="wysiwyg/banners/banner2.jpg"}}" alt="Megamall" /></div>
Front-end Appearance:

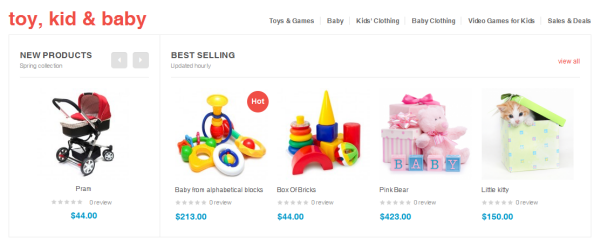
7. position-7: Toy, Kids& Baby
Back-end Settings<div class="block block-cate"> <h2><a href="{{store direct_url=""}}new-products.html">toy, kid & baby</a></h2> <ul> <li><a href="{{store direct_url=""}}blackfriday.html">Toys & Games</a></li> <li><a href="{{store direct_url=""}}hot-trend.html">Baby</a></li> <li><a href="{{store direct_url=""}}new-design.html">Kids' Clothing</a></li> <li><a href="#">Baby Clothing</a></li> <li><a href="#">Video Games for Kids</a></li> <li><a href="#">Sales & Deals</a></li> </ul> </div> <div class="col2-set list-categories"> <div class="col-1">{{block type="joomlart_jmproductsslider/list" name="cate.jmproductsslider1" template="joomlart/jmproductsslider/horizontallist.phtml" title="New products <span>Spring collection</span>" mode="latest" number_items="1" width="237" height="170" catsid="28"}}</div> <div class="col-2">{{block type="joomlart_jmproducts/list" name="home.jmproducts.list" title="Best Selling <span>Updated hourly"</span> template="joomlart/jmproducts/list.phtml" catsid="29"}}</div> </div>
Front-end Appearance:
8. position-8: Position 8
Back-end Settings<div><img src="{{media url="wysiwyg/banners/banner3.jpg"}}" alt="Megamall" /></div>
Front-end Appearance:

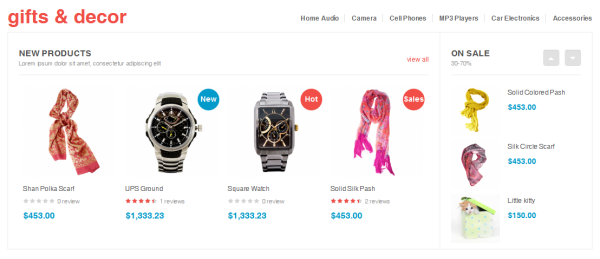
9. position-9: Gifts & Decor
Back-end Settings<div class="block block-cate"> <h2><a href="{{store direct_url=""}}decor.html">Gifts & Decor</a></h2> <ul> <li><a href="{{store direct_url=""}}puppy.html">Home Audio</a></li> <li><a href="{{store direct_url=""}}skatings.html">Camera</a></li> <li><a href="{{store direct_url=""}}decorations.html">Cell Phones</a></li> <li><a href="#">MP3 Players</a></li> <li><a href="#">Car Electronics</a></li> <li><a href="#">Accessories</a></li> </ul> </div> <div class="col2-set list-categories list-cate-colr"> <div class="col-1">{{block type="joomlart_jmproductsslider/list" name="cate.jmproductsslider2" template="joomlart/jmproductsslider/verticallist.phtml" title="on sale <span>30- 70%</span>" mode="latest" perrow="1" number_items="3" itemwidth="240" catsid="12"}}</div> <div class="col-2">{{block type="joomlart_jmproducts/list" name="home.jmproducts.list" title="new products <span>Lorem ipsum dolor sit amet, consectetur adipiscing elit</span>" mode="latest" template="joomlart/jmproducts/list.phtml" catsid="5"}}</div> </div>
Front-end Appearance:
10. position-10: Position 10
Back-end Settings<div><img src="{{media url="wysiwyg/banners/banner4.jpg"}}" alt="Megamall" /></div>
Front-end Appearance:

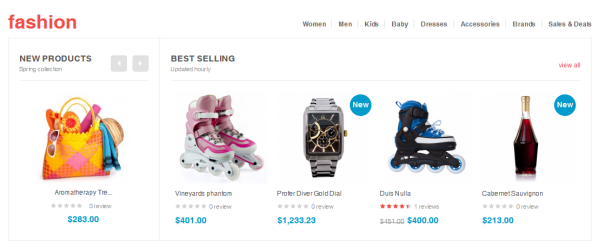
11. position-11: Fashion
Back-end Settings<div class="block block-cate"> <h2><a href="{{store direct_url=""}}fashion.html">fashion</a></h2> <ul> <li><a href="{{store direct_url=""}}electronics.html">Women</a></li> <li><a href="{{store direct_url=""}}decor.html">Men</a></li> <li><a href="{{store direct_url=""}}gifts.html">Kids</a></li> <li><a href="{{store direct_url=""}}beauty-health.html">Baby</a></li> <li><a href="#">Dresses</a></li> <li><a href="#">Accessories</a></li> <li><a href="#">Brands</a></li> <li><a href="#">Sales & Deals</a></li> </ul> </div> <div class="col2-set list-categories"> <div class="col-1">{{block type="joomlart_jmproductsslider/list" name="cate.jmproductsslider1" template="joomlart/jmproductsslider/horizontallist.phtml" title="New products <span>Spring collection</span>" mode="latest" number_items="1" width="237" height="170" catsid="26"}}</div> <div class="col-2">{{block type="joomlart_jmproducts/list" name="home.jmproducts.list" title="Best Selling <span>Updated hourly</span>" mode="best_buy" template="joomlart/jmproducts/list.phtml" catsid="3"}}</div> </div>
Front-end Appearance:
12. position-12: Position 12
Back-end Settings<div><img src="{{media url="wysiwyg/banners/banner1.jpg"}}" alt="Megamall" /></div>
Front-end Appearance:

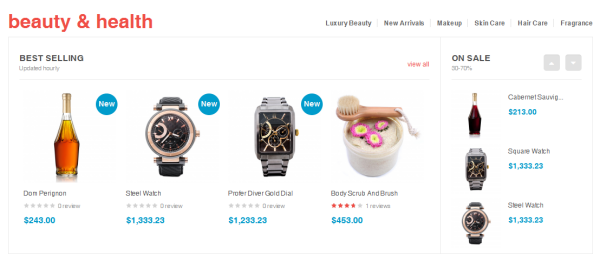
13. position-13: Beauty & Health
Back-end Settings<div class="block block-cate"> <h2><a href="{{store direct_url=""}}gifts/beauty-health.html">beauty & health</a></h2> <ul> <li><a href="#">Luxury Beauty</a></li> <li><a href="#">New Arrivals</a></li> <li><a href="#">Makeup</a></li> <li><a href="#">Skin Care</a></li> <li><a href="#">Hair Care</a></li> <li><a href="#">Fragrance</a></li> </ul> </div> <div class="col2-set list-categories list-cate-colr"> <div class="col-1">{{block type="joomlart_jmproductsslider/list" name="cate.jmproductsslider13" template="joomlart/jmproductsslider/verticallist.phtml" title="on sale <span>30-70%</span>" mode="latest" perrow="1" number_items="3" catsid="30"}}</div> <div class="col-2">{{block type="joomlart_jmproducts/list" name="home.jmproducts.list" title="Best Selling <span>Updated hourly</span>" mode="best_buy" template="joomlart/jmproducts/list.phtml" catsid="27"}}</div> </div>
Front-end Appearance:
14. position-14: Logo Companies
Back-end Settings<ul> <li><img src="{{media url="wysiwyg/brands/logo-puma.jpg"}}" alt="" /></li> <li><img src="{{media url="wysiwyg/brands/logo-adidas.jpg"}}" alt="" /></li> <li><img src="{{media url="wysiwyg/brands/logo-sony.jpg"}}" alt="" /></li> <li><img src="{{media url="wysiwyg/brands/logo-gateway.jpg"}}" alt="" /></li> <li><img src="{{media url="wysiwyg/brands/logo-zippo.jpg"}}" alt="" /></li> <li><img src="{{media url="wysiwyg/brands/logo-olay.jpg"}}" alt="" /></li> <li><img src="{{media url="wysiwyg/brands/logo-lego.jpg"}}" alt="" /></li> <li><img src="{{media url="wysiwyg/brands/logo-loreal.jpg"}}" alt="" /></li> </ul>
Front-end Appearance:

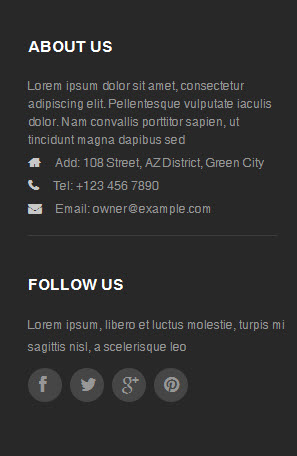
15. position-15: About Us
Back-end Settings<div class="about-follow-us"> <div class="block block-aboutus"> <div class="block-title"><strong><span>About Us</span></strong></div> <div class="block-content"> <p>Lorem ipsum dolor sit amet, consectetur adipiscing elit. Pellentesque vulputate iaculis dolor. Nam convallis porttitor sapien, ut tincidunt magna dapibus sed</p> <ul class="list-info"> <li class="address"><em class="fa fa-home"> </em><span>Add:</span> 108 Street, AZ District, Green City</li> <li class="phone"><em class="fa fa-phone"> </em><span>Tel:</span> +123 456 7890</li> <li class="email"><em class="fa fa-envelope"> </em><span>Email:</span>This email address is being protected from spambots. You need JavaScript enabled to view it.</li> </ul> </div> </div> <div class="block block-followus"> <div class="block-title"><strong><span>Follow us</span></strong></div> <div class="block-content"> <p>Lorem ipsum, libero et luctus molestie, turpis mi sagittis nisl, a scelerisque leo</p> <ul class="list-socials"> <li class="first"><a href="http://www.facebook.com/joomlart"><em class="fa fa-facebook"> </em></a></li> <li><a href="https://twitter.com/JoomlArt"><em class="fa fa-twitter"> </em></a></li> <li><a href="http://www.joomlart.com"> <em class="fa fa-google-plus"> </em></a></li> <li class="last"><a href="http://www.joomlart.com"> <em class="fa fa-pinterest"> </em></a></li> </ul> </div> </div> </div>
Front-end Appearance:
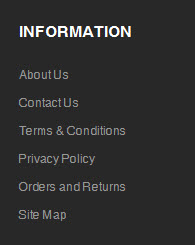
16. position-17: Information
Back-end Settings<div class="block block-information col-1 first"> <div class="col-inner"> <div class="block-title"><strong><span>Information</span></strong></div> <div class="block-content"> <ul> <li><a href="{{mall direct_url="about-magento-demo-mall"}}">About Us</a></li> <li><a href="{{mall direct_url="contacts"}}">Contact Us</a></li> <li><a href="{{mall direct_url="terms-conditions"}}">Terms & Conditions</a></li> <li><a href="{{mall direct_url="privacy-policy-cookie-restriction-mode"}}">Privacy Policy</a></li> <li><a href="{{mall direct_url="sales/guest/form"}}">Orders and Returns</a></li> <li><a href="{{mall direct_url="catalog/seo_sitemap/category"}}">Site Map</a></li> </ul> </div> </div> </div>
Front-end Appearance:
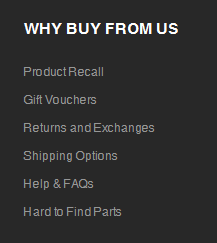
17. position-18: Why Buy From Us
Back-end Settings<div class="block block-why-us col-2"> <div class="col-inner"> <div class="block-title"><strong><span>why buy from us</span></strong></div> <div class="block-content"> <ul> <li><a href="#">Product Recall</a></li> <li><a href="#">Gift Vouchers</a></li> <li><a href="#">Returns and Exchanges</a></li> <li><a href="#">Shipping Options</a></li> <li><a href="#">Help & FAQs</a></li> <li><a href="#">Hard to Find Parts</a></li> </ul> </div> </div> </div>
Front-end Appearance:
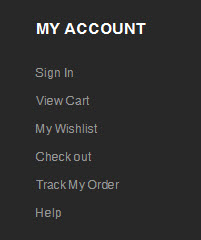
18. position-19: My Account
Back-end Settings<div class="block block-my-account col-3"> <div class="col-inner"> <div class="block-title"><strong><span>My account</span></strong></div> <div class="block-content"> <ul> <li><a href="#">Sign In</a></li> <li><a href="#">View Cart</a></li> <li><a href="#">My Wishlist</a></li> <li><a href="#">Check out</a></li> <li><a href="#">Track My Order</a></li> <li><a href="#">Help</a></li> </ul> </div> </div> </div>
Front-end Appearance:
19. position-20 : Useful Links
Back-end Settings<div class="block block-links col-4 last"> <div class="col-inner"> <div class="block-title"><strong><span>Userful links</span></strong></div> <div class="block-content"> <ul> <li><a href="#">Pricing Policy</a></li> <li><a href="#">Shipping Policy</a></li> <li><a href="#">Payment Methods</a></li> <li><a href="#">Payment Methods</a></li> <li><a href="#">Site Information</a></li> <li><a href="#">Your Satisfaction</a></li> </ul> </div> </div> </div>
Front-end Appearance:

20. featured-product: Featured Products
Back-end Settings<div>{{block type="joomlart_jmproducts/list" name="twoproduct" title="" quanlity="2" template="joomlart/jmproducts/twoproduct.phtml"}}</div>
Front-end Appearance:
Note:
The block will be displayed in Mega Menu.
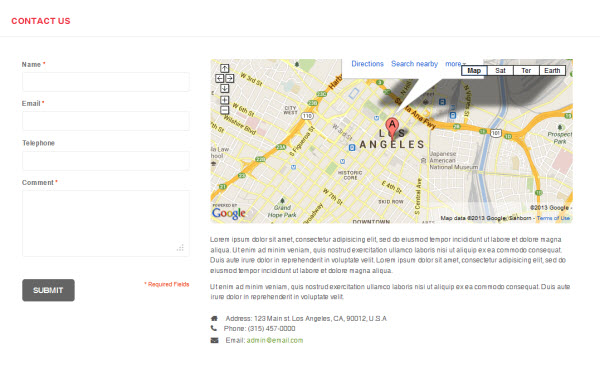
21. contactinfo: Contact Map
Back-end Settings<div class="contact-info"> <div class="inner"><iframe src="https://maps.google.com/maps?f=q&source=s_q&hl=en&geocode=&q=123+Main+st.+Los+Angeles,+CA,+90012,+U.S.A+&sll=37.0625,- 95.677068&sspn=34.176059,86.572266&ie=UTF8&hq=&hnear=123+S+Main+St,+Los+Angeles,+California+90012&t=m&ll=34.051877,- 118.243704&spn=0.027023,0.072012&z=14&iwloc=A&output=embed" frameborder="0" marginwidth="0" marginheight="0" scrolling="no" width="100%" height="295"></iframe> <div class="info-inner"> <p>Lorem ipsum dolor sit amet, consectetur adipisicing elit, sed do eiusmod tempor incididunt ut labore et dolore magna aliqua. Ut enim ad minim veniam, quis nostrud exercitation ullamco laboris nisi ut aliquip ex ea commodo consequat. Duis aute irure dolor in reprehenderit in voluptate velit. Lorem ipsum dolor sit amet, consectetur adipisicing elit, sed do eiusmod tempor incididunt ut labore et dolore magna aliqua.</p> <p>Ut enim ad minim veniam, quis nostrud exercitation ullamco laboris nisi ut aliquip ex ea commodo consequat. Duis aute irure dolor in reprehenderit in voluptate velit.</p> <div class="info-inner2"> <ul class="list-info"> <li class="address"><em class="fa fa-home"> </em><span>Address:</span> 123 Main st. Los Angeles, CA, 90012, U.S.A</li> <li class="phone"><em class="fa fa-phone"> </em><span>Phone:</span> (315) 457-0000</li> <li class="email"><em class="fa fa-envelope"> </em><span>Email:</span> <a href="mailto:This email address is being protected from spambots. You need JavaScript enabled to view it.">This email address is being protected from spambots. You need JavaScript enabled to view it.</a></li> </ul> </div> </div> </div> </div>
Front-end Appearance:
Note:
The block will be displayed in Contact Us Page.
22. colors: Colors
Back-end Settings<div class="colors-setting"><label for="select-colors">colors:</label> <a class="colors-default" href="{{mall url=""}}? jmcolor=default"><span>default</span></a> <a class="colors-green" href="{{mall url=""}}?jmcolor=green"><span>green</span></a> <a class="colors- pink" href="{{mall url=""}}?jmcolor=pink"><span>pink</span></a> <a class="colors-red" href="{{mall url=""}}? jmcolor=red"><span>red</span></a> <a class="colors-violet" href="{{mall url=""}}?jmcolor=violet"><span>violet</span></a> <a class="colors- boxes" href="{{mall url=""}}?jmcolor=boxes"><span>boxes</span></a></div>
Front-end Appearance:

Note:
The block will be displayed in Settings Menu.
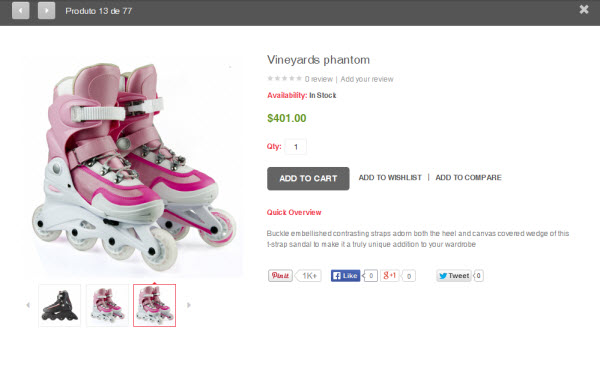
23. addshare: Social Share
Back-end Settings<!-- AddThis Button BEGIN --> <div class="addthis_toolbox addthis_default_style"> </div> <script type="text/javascript">// <![CDATA[ var addthis_config = {"data_track_addressbar":false}; // ]]></script> <script type="text/javascript" src="//s7.addthis.com/js/300/addthis_widget.js#pubid=ra-4e5efa0b57af4dbc"></script> <!-- AddThis Button END -->
Front-end Appearance:

Note:
The block will be displayed in Product Details Page.
Extension Configuration
1. JM Slideshow Extension
In the Magento Admin Panel, navigate to System >> Configuration >> JM Slideshow and configure the default settings as the Back-end Settings.
In order to get the slideshow displayed at the top position on the front-page, navigate to CMS >> Pages >> select the actual page >> Design tab. Copy and paste the following code into the "Layout Update XML" field.
<reference name="tops2">

<block type="cms/block" name="position-3">

<action method="setBlockId"><block_id>position-3</block_id></action>

</block>

</reference>
Front-end Appearance
2. JM Products Extension
In the Magento Admin Panel, navigate to System >> Configuration >> JM Products and configure the default settings as the Back-end Settings.
Front-end Appearance
Note:
The JM Products extension will be displayed three times at Home Page.
3. JM Masshead Extension
JM Masshead Magento extension can be displayed at any position. In JM Megamall Demo site, this extension is being used at the header of the category pages.
In the Magento Admin Panel, navigate to System >> Configuration >> JM Masshead and configure the default settings as the Back-end Settings.
To get this extension for any categories, navigate to Catalog >> Manage Categories >> select the actual category as shown in Back-end Settings.
Copy and paste the following code into the "Custom Layout Update" tab.
<reference name="mass-head">

<block type="joomlart_jmmasshead/core" name="jmmasshead">

<action method="setData"><name>background</name><value>wysiwyg/masshead/product01.jpg</value></action>

</block>

</reference>
Front-end Appearance

4. JM Basetheme Extension
In the Magento Admin Panel, navigate to System >> Configuration >> JM Basetheme and configure the default settings as the Back-end Settings.
Front-end Appearance
5. JM Products Slider Extension
Navigate to System >> Configuration >> JM Products Slider and configure the default settings as Back-end Settings.
To display this module at the top position onto front-page, copy and paste the following code into the "Custom Design" tab.
<reference name="tops2">

<block type="cms/block" name="position-3">

<action method="setBlockId"><block_id>position-3</block_id></action>

</block>

</reference>
Front-end Appearance

6. JM Mega Menu Extension
Navigate to System >> Configuration >> JM Mega Menu, enable and choose the animation effect for your menu as the Back-end Settings. For detailed configuration of each menu item, please refer to the Menu Configuration.
Front-end Appearance

7. JM Quickview Extension
Navigate to System >> Configuration >> JM Quickview and configure the default settings as Back-end Settings.
Front-end Appearance
8. JM Advance Search Extension
Navigate to System >> Configuration >> JM Advance Search and configure the default settings as Back-end Settings.
Front-end Appearance
9. Label Configuration
To label any products, follow these steps.
Step 1: At Theme Settings, select "Yes" value to enable Labelling function.

Step 2: Navigate to Catalog >> Attributes >> Manage Attributes and create a new attribute named Label.
- Properties - Back-end Settings
- Manage Label/ Options - Back-end Settings
Step 3: Navigate to Catalog >> Attributes >> Manage Attribute Sets to add the "Label" attribute into "Default Attribute Set".
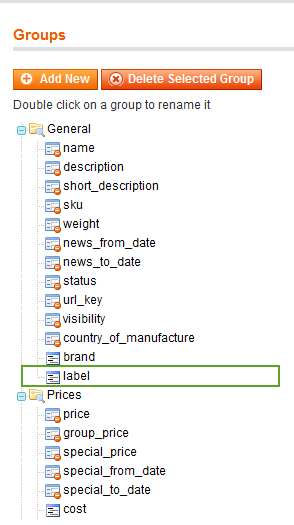
Step 4: Simply choose the label you want for each product as Back-end Settings.
Mega Menu Configuration
JM Megamall supports Magento extenstion Mega Menu. Follow the guide below to get it configured properly.
In the Magento Admin Panel, please navigate JoomlArt >> JM Mega Menu >> Manage Menu Groups. You need to create a Menu group first. For each store language view, you will need to create a different menu group. Once done, select the store language view that you want to create a menu and click "Add Menu Item" button to define the menu items. The default settings belong to English group. Other language groups have similar settings for menu items.
To add menu group, navigate to JM Mega Menu >> Manage Menu Groups and then click on Add Menu Group button.
Add Menu Group form is displayed as below:
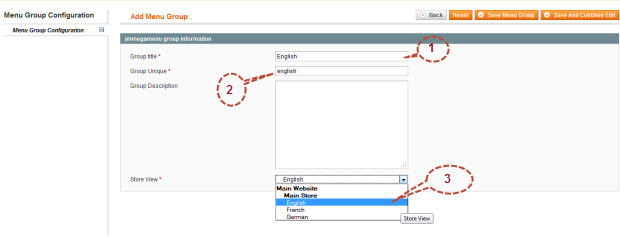
Next, config parameters
- Group Title: to identify group name.
- Group Unique: identify as ID of Group and it's unique
- Group Description: contains group description
- Store View: to identify store for menu group to display in frontend.
Finally, click on "Save" button to save config parameters
You can see menu group following "Store View" in frontend


